


Overview
The Groopit App for Salesforce transforms how companies gather actionable insights from employees working in Slack and Microsoft Teams. With only a few quick taps from any conversation, employees can share information, associate each insight with an account or opportunity, and simultaneously add this knowledge to Salesforce. This guide will walk you through the supported features, requirements and configuration steps. Instructions begin here.
Supported Features
Permission Sets & Security
Groopit App for Salesforce includes 2 permission sets to give Salesforce administrators flexibility to manage Groopit’s integration with Salesforce.
- For administrators that allows Groopit-related administration including linking and unlinking of groups to Salesforce.
- For users that allows data sharing and improves field-level security.
Groopit User/Administrator permission set includes permissions for fields pre-packaged with the Groopit Shared Data object to provide enforcement of field-level security.
Permission can be assigned seperately.
Save data from any Groopit client to Salesforce
If a Groopit Data Model has a related Salesforce object, data can be shared from any Groopit client and can be saved in Salesforce. Each Groopit report will also have a link to take the user to the Salesforce object. If the Groopit data is later edited in Groopit, it will also be updated in Salesforce. Only users with Salesforce permissions can share data to Salesforce from Groopit clients.
How it works
After linking a Groopit to Salesforce and relating the Groopit Shared Data object to an object in Salesforce, users on any Groopit client will get a “Save to Salesforce” section in the Data Model whenever they share data with Groopit. When they click that check box, they’ll be asked to sign in to their Salesforce account. After signing in, they’ll get a drop down that will let them pick the related object in Salesforce. The data entered in Groopit will then be saved to that object in Salesforce.
If a user doesn’t have a Salesforce account they can continue to share data to Groopit, that data won’t get added to Salesforce. Salesforce user permissions are used to control access and sharing in Salesforce, so the user must be a Salesforce user.
If a user is not a Salesforce user, Groopit Organizers can edit a report from that user and add the association using their credentials. Once the data is associated with a Salesforce object, the original user, who does not have Salesforce permissions, will no longer be able to edit the data in Groopit.
Users can change the Salesforce object a report is associated with or remove the Salesforce related object and Groopit will not send data to Salesforce. Groopit does not delete data from Salesforce. If you remove a link or delete the report on the Groopit side, it will not be deleted in Salesforce.
Field Mapping
By default, Groopit saves any data shared in an unstructured text field. This is the quickest and easiest way to set up and see the Groopit data related to Salesforce objects but it doesn’t allow Groopit data to be used in Salesforce reporting. To use data in Salesforce reporting, Groopit supports the ability to map specific fields of Groopit data into fields on the Groopit Shared data object. In order to do that, the Salesforce Administrator will need to add new fields to the Groopit Shared Data object.
Integration Requirements
- You must be an existing Groopit customer to use the Groopit App for Salesforce. (Request a demo to learn more.)
- You must be an administrator for the Groopit you want to integrate.
- To install the Groopit App for Salesforce, you must have Salesforce Lightning and be a Salesforce administrator.
Installation
- Install Groopit for Salesforce from the AppExchange.
- Login to Salesforce organization when prompted. You will be taken to an Install Groopit for Salesforce Screen.
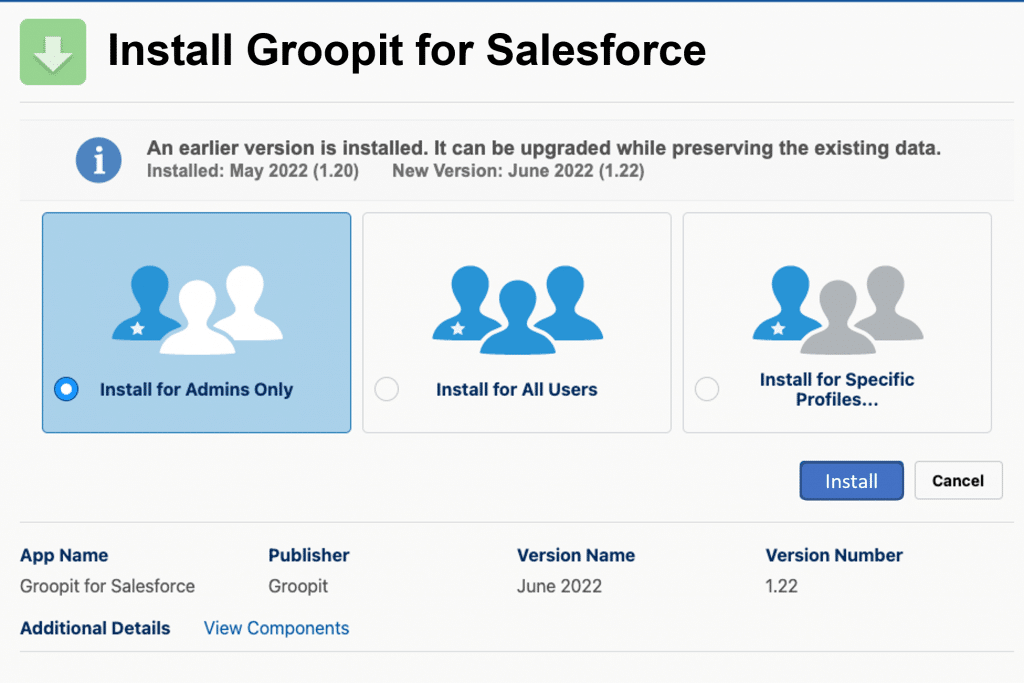
- Choose “Install for Admins Only”
- Click Install to begin installation
Adjust Settings
Remote Site – Create Remote Site to give Salesforce permission to make API calls to Groopit
- Search for Remote Site Settings
- Click on Remote Site Settings in search results
- Click New Remote Sight and edit Remote Site Settings
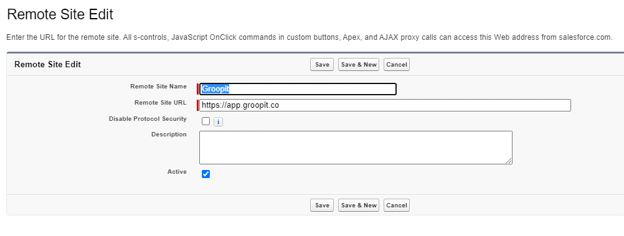
- Add Remote Site Name
- Add Remote Site URL: – https://app.groopit.co
- Click Save
Edit Custom Metadata
- Enter into search “Custom Metadata”
- Go to “Custom Metadata Types”
- Find “Groopit Settings”
- Click “Manage Records”
- Click “New”
- Edit Settings

- Add Label – Groopit or any label
- Groopit Settings Name is auto-generated by Salesforce
- Add Groopit Service URL – https://app.groopit.co
- Add Groopit Organization ID – If you are using SSO, enter your Groopit organization ID included with your credentials in the Organization ID field so end users will be taken to SSO login. If you’re not using SSO, leave blank and users will be taken to standard Groopit login.
- Click Save
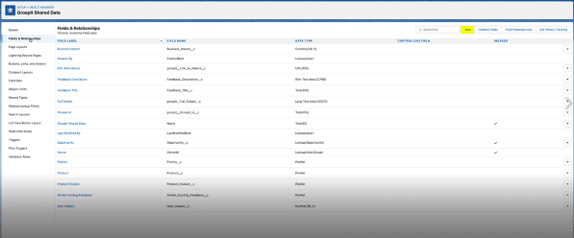
Associate Groopit Shared Data Object with the Salesforce Object
- Go to Object Manager
- Scroll down to Groopit Shared Data Object
- Find “Groopit Settings”
- Click “New”
Step 1 of 6: Check circle by Lookup Relationship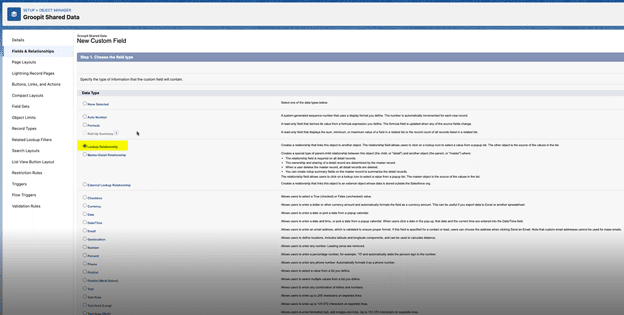
Click Next
Step 2 of 6: Pick a Salesforce Object to associate the Groopit object with, such as “Account”. Groopit Shared Data object can be shared with any Salesforce Object such as Account, Opportunity, or a custom Salesforce Object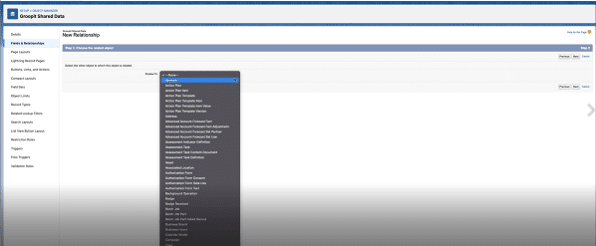
Step 3 of 6: Enter the label and name for the lookup field
Click in the Field Name box. Salesforce will auto-generate Field Label based on chosen object and will auto-generate the Field Name based on Field Label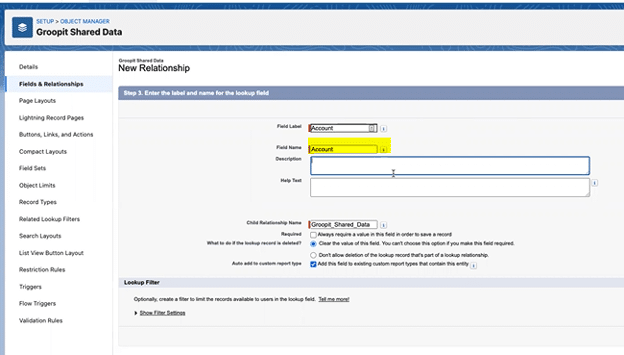
Don’t make it required
Click Next
Step 4 of 6: Accept defaults or setup according to your organization requirements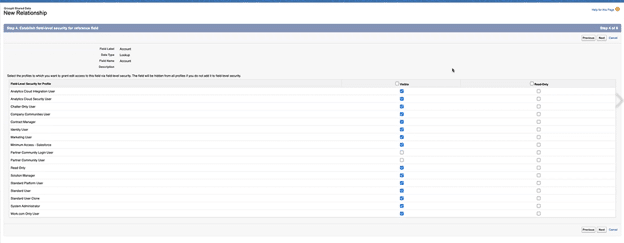
Click Next
Step 5 of 6. Click Next to accept defaults and add to field layout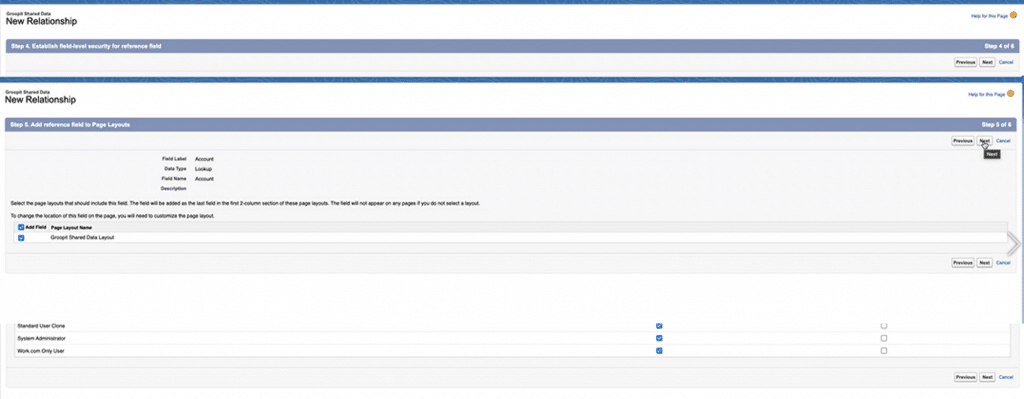
Step 6 of 6: Review defaults for how Groopit will be labeled on related list. Confirm label and click Save.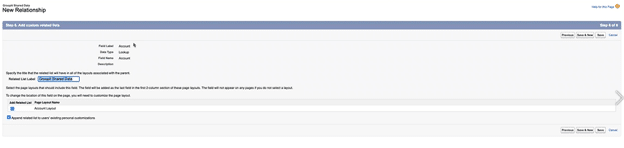
also Go to Salesforce Object you associated with Groopit Object, such as “Account”
- Return to Object manager and click on “Account” or the object you just associated.
- Click Page layouts, pick appropriate layout
- Find Groopit related list
- Click on wrench to adjust settings
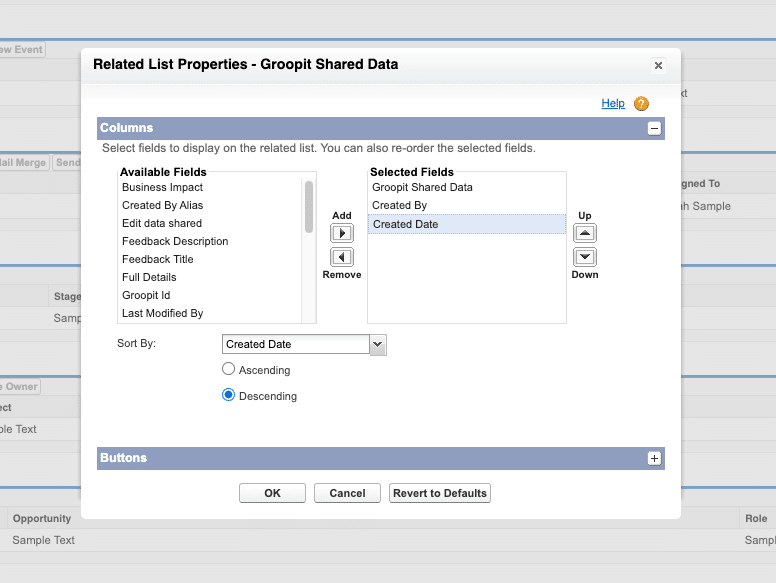
- Add “Created By” and “Created Date”
- Change default sort order date to Descending
- Click “Ok” on the dialog
- Click “Save” on the layout page
Repeat the steps in this section you want to associate the Groopit Data object with additional Salesforce objects. such as opportunity and case.
Create New Permission Set and Permission Set Group
Salesforce does not allow the permission set shipped with the application to be edited. You will need to create a new permission set to grant read and edit access to the object and create a new permission set group to link the 2 permission sets, so any future changes to the application can be implemented in the new permission set.
- Go to Users
- Click on Permission Set
- Click New (left corner above the permission set list)
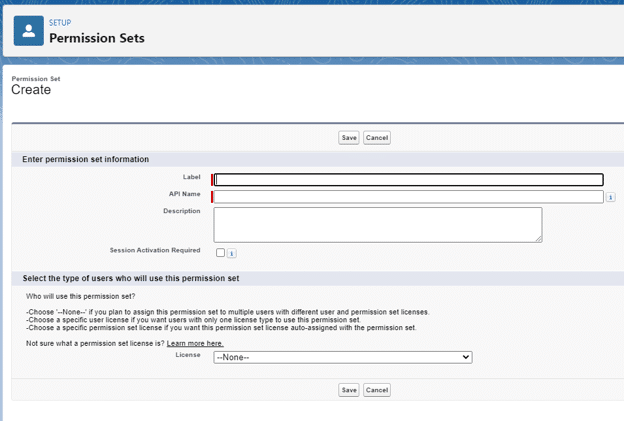
- Add a Label, for example “Groopit User Extended”. Salesforce will automatically fill in the API name.
- Click Save
- Click Object Settings
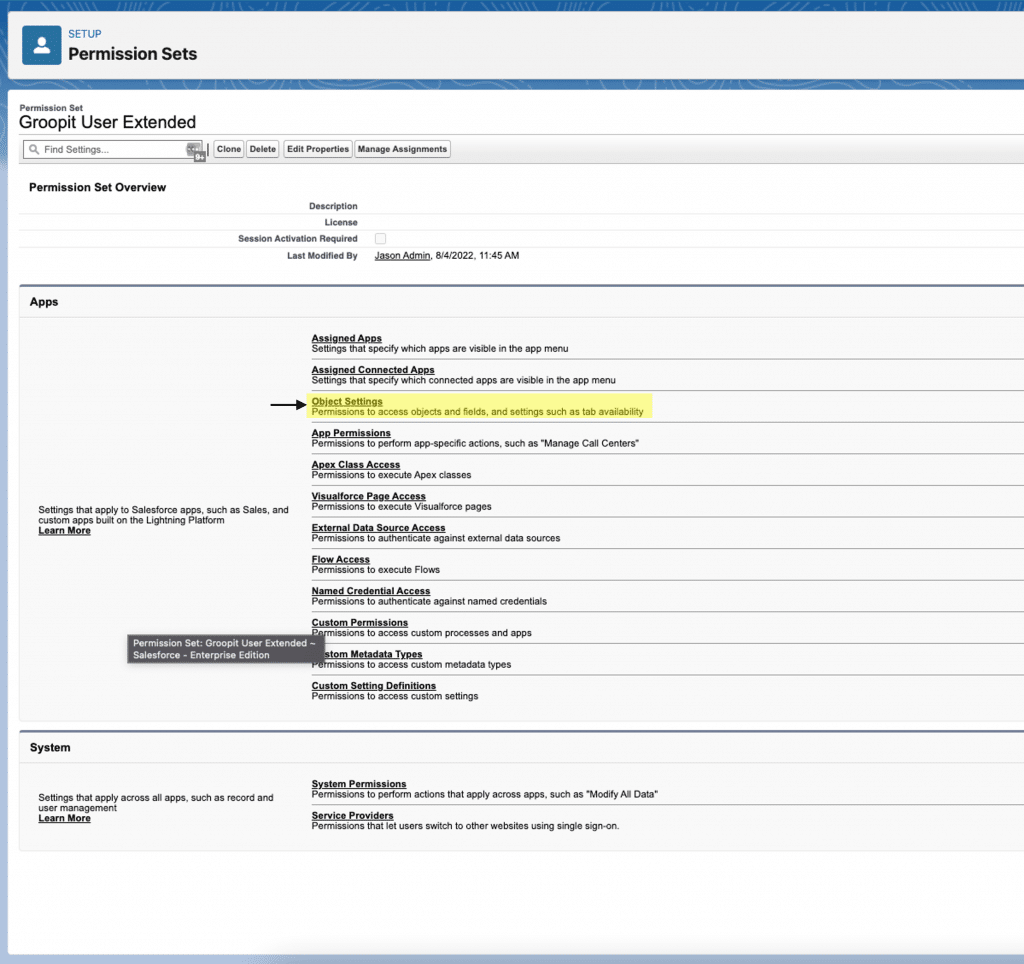
- Scroll down and find Groopit Shared Data, click on it.
- Click Edit
- Scroll down to the Field Settings, find the Field name, such as “Account”
- Click the boxes to give read and edit permissions
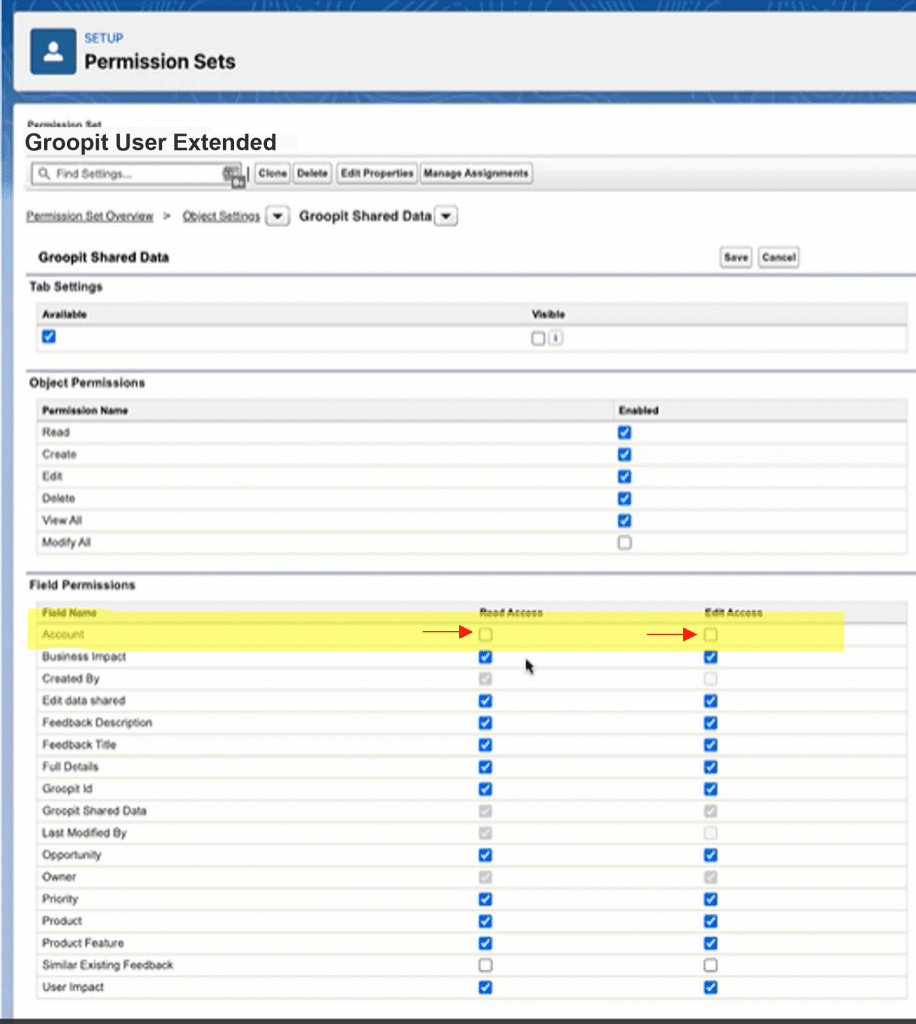
- Click Save
Create a new user permission set group
To have the permission set created above updated if changes are made to the permission set at a future date, you will need to create a new permission set group, linking the Groopit User permission set and the new permission set created above.
- Click on Permission Set Groups
- Click on New Permission Set Group
- Add a Label, such as “Groopit User Extended”, the API name will be automatically generated.
- Click Save
- Click on Permission Sets in Group
- Click Add Permission Sets
- Find Groopit User and check box
- Find the Permission set created above and check box
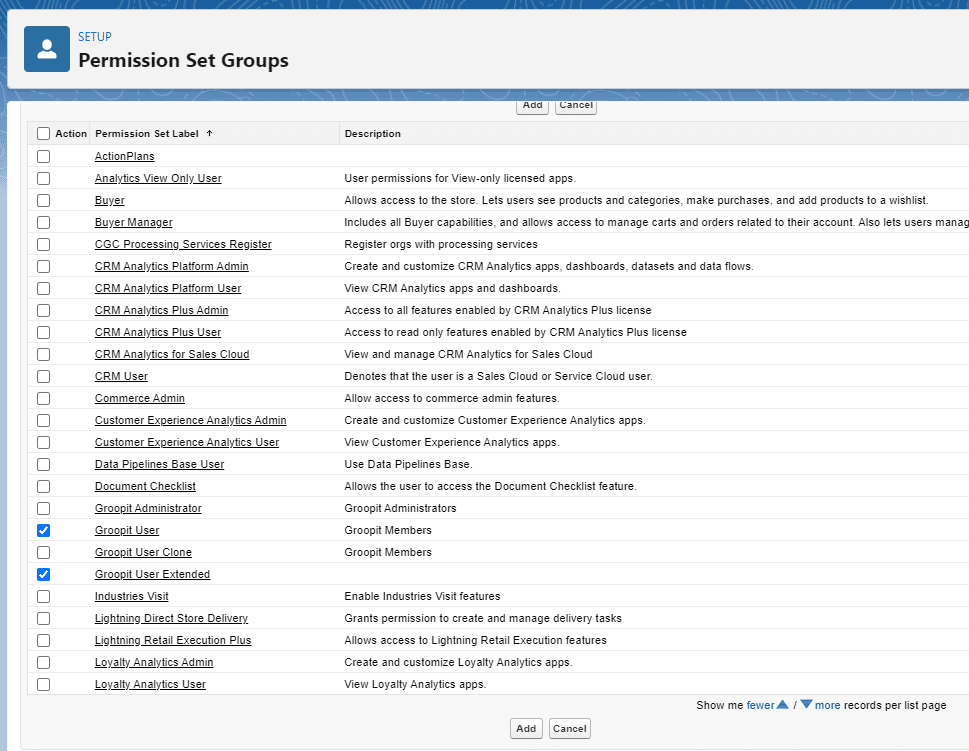
- Click Add
Create new administrator permission set
- Click on Permission Set Groups
- Click on New Permission Set Group
- Add a Label, such as “Groopit Administrator Extended”, the API name will be automatically generated.
- Click Save
- Click on Permission Sets in Group
- Click Add Permission Sets
- Find Groopit Administrator and check box
- Find the Groopit User permission set created above and check box
- Click Add
- Click Done
Assign users to permission set groups
- Go to Permission Set Groups, and click on the permission set you want to add users
- Click Manage Assignments
- Click Add Assignments
- Check the box by each user that needs User permission.
- Click Assign
- Repeat for Users that need Groopit Administrator permissions. Users with Groopit Administrator permissions will be able to link and unlink groups in Salesforce.
Configure Trusted URLs for data model icons and sharing of files and photos
The Salesforce Administrators need to set up Trusted URLs so that the Groopit App for Salesforce can display data model icons and upload Files and Pictures.
- To do this, the administrator needs to navigate to “Setup”:

- Navigate to Trusted URLs
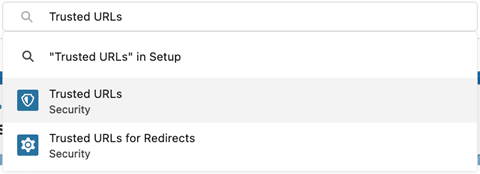
In the “Quick Find”, search for “Trusted URLs”:
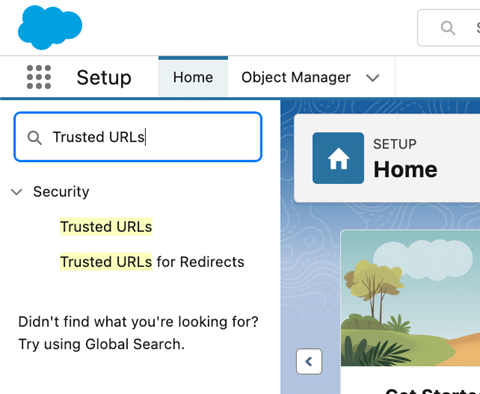
Alternatively, use the “Search Setup”, search for “Trusted URLs”:
3. Click “New Trusted URL”: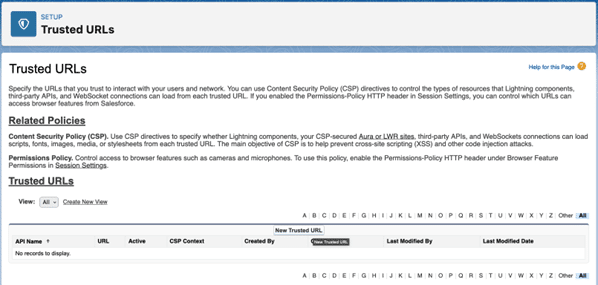
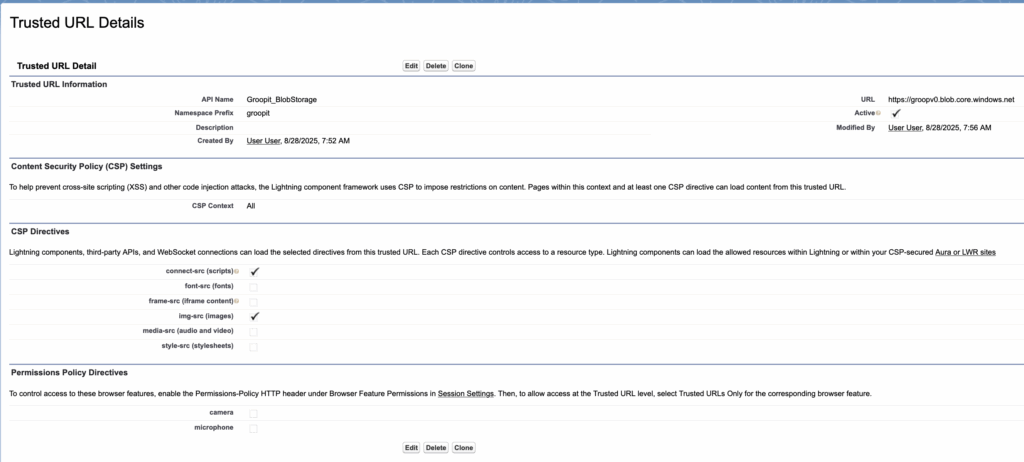
4. Setting properties
a. Set “API Name” to something that identifies this Trusted URL is for Groopit. The name does not matter here as it is only for administrator reference.
b. Set the “URL” to https://groopv0.blob.core.windows.net. This value is required to match the provided value here.
c. Set the “CSP Context” to “Lightning Experience Pages”.
d. Check the box for “CSP Directives” of “connect-src (scripts)” and “img-src (images)”.

e. Click “Save & New”.
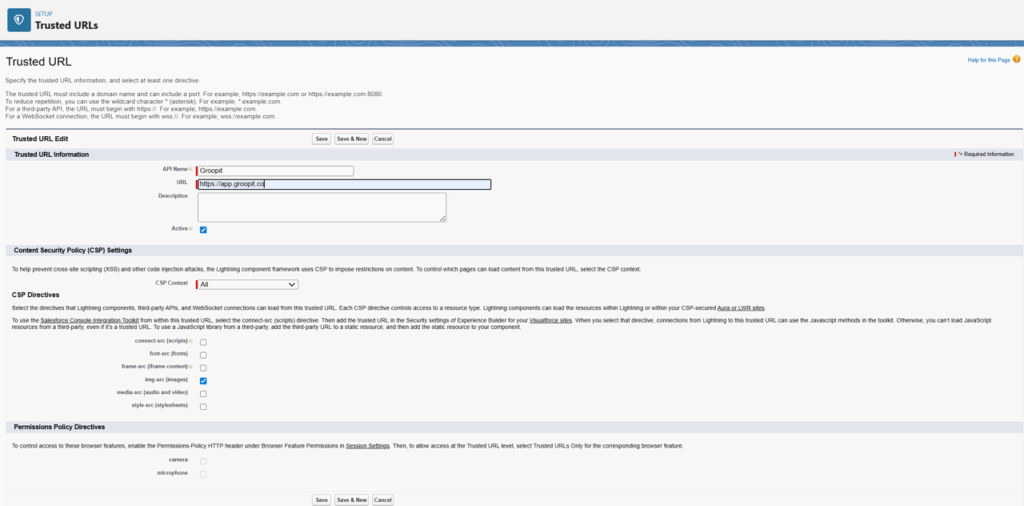
5. Setting properties
a. Set “API Name” to something that identifies this Trusted URL is for Groopit, such as “Groopit Web”. The name does not matter here as it is only for administrator reference.
b. Set the “URL” to https://app.groopit.co. This value is required to match the provided value here.
c. Set the “CSP Context” to “Lightning Experience Pages”.
d. Check the box for “CSP Directives” of “img-src (images)”.
e. Click “Save”

5. The Trusted URL should now appear in the list if the administrator returns to “Trusted URLs”:
Link Groopit group to Salesforce object
- User with Groopit administrator permissions, find related list on Salesforce object (e.g. “Account”) and click new.
- Administration of Groopit – Salesforce connections will appear. Expand to all groups that the user has organizer permissions.

- Click link to connect Groopit group to Salesforce object. Repeat for all groups that need to be connected.
Add Save to Salesforce field to Groopit data model
Once linked, a person with Groopit organizer and Salesforce permissions can add the Save to Salesforce data field and any fields to inherit data from Salesforce to the Groopit data model.
From the Groopit web application, log-in with Groopit Admin credentials, open the Groopit group linked to Salesforce in the above step:
- Tap the Share menu and find the data model to share or inherit data from Salesforce.
- Tap the three dots in the lower right-hand corner, and choose Edit from the menu. This will take you to the page to edit the data model.
- Scroll down to the list of data fields and choose Save to Salesforce. Tap Add field and a new Save to Salesforce field will be added to the end of the data model.
- Find the Save to Salesforce field, log-in with your Salesforce credentials following the prompts, if requested.
- Choose the object in Salesforce (such as Account, Opportunity or Case) where you want to save the Groopit data.
- If there is information already in Salesforce that needs to be added to Groopit, tap “Inherit additional data from Salesforce” just below the Salesforce object and choose the data from the list. Tap it again to inherit additional pieces of data.
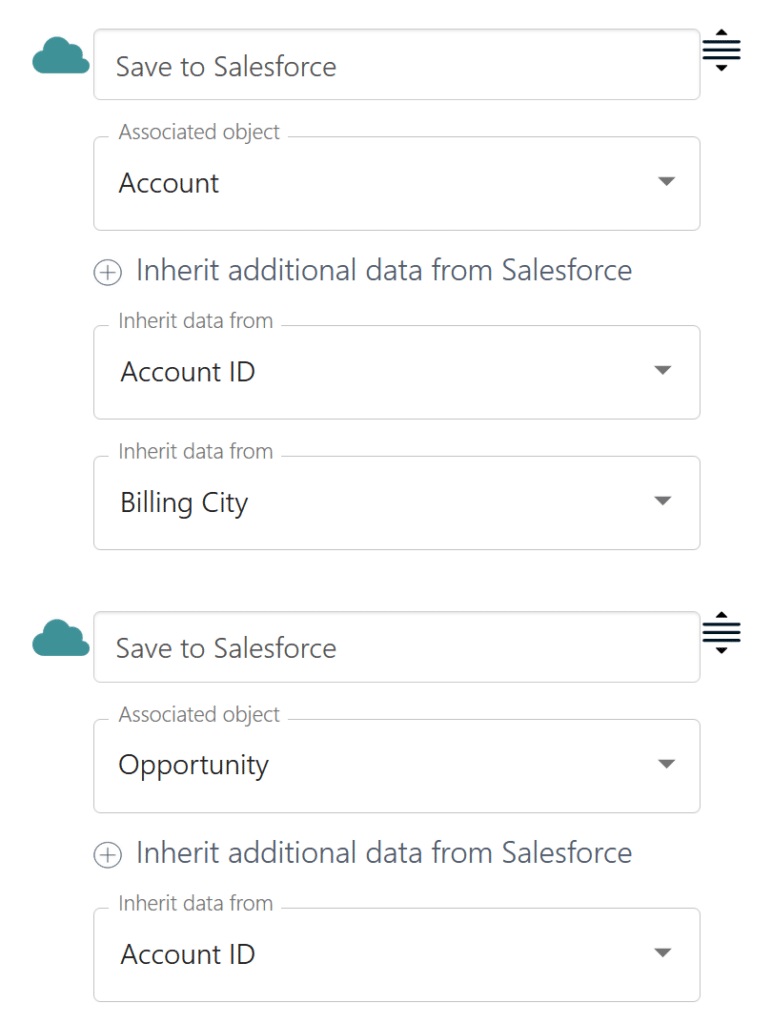
- To save to additional Salesforce objects, Add another Save to Salesforce field and repeat steps 5 and 6.
- Once you have added all the objects in Salesforce and identified the data to be inherited scroll to the end and Tap Save.
Edit Object Page
Groopit should be easily accessible from wherever users are working in Salesforce. Groopit recommends adding a Related List Quick Links Component and an Insights Tab with the Groopit Shared Data related list to a Tab component. The recommended configuration gives users a consistent and easy way to share and consume insights, no matter which Salesforce object they are working in. The recommended configuration is shown below:
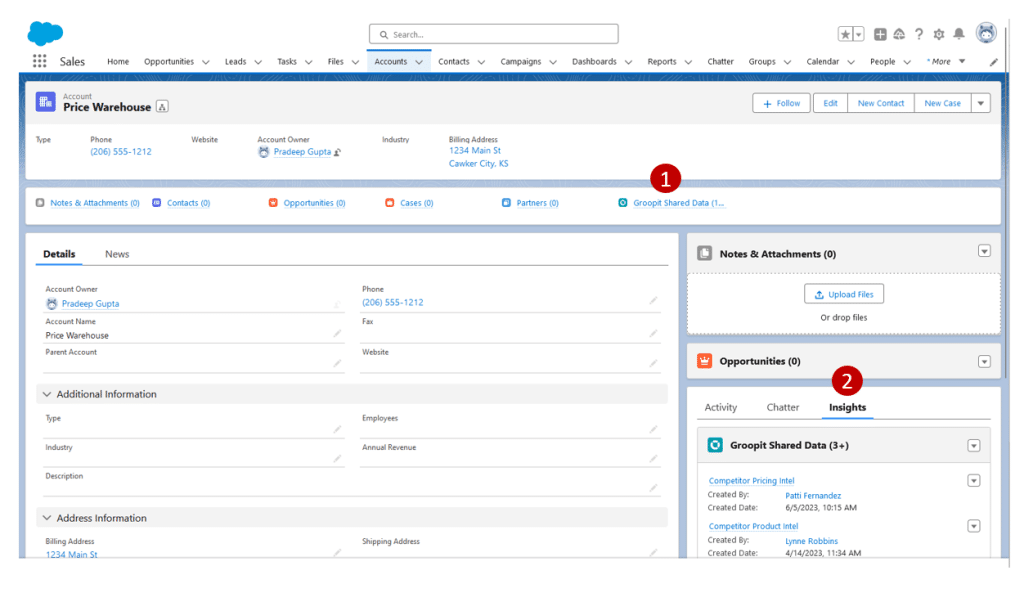
- Add a Related List Quick Links Component to the main object page.
To add this component:
a. Go to Settings, and choose Edit page
b. Find the component list in the left-hand navigation.
c. Drag and drop the Related List Quick Links component to where you want it.
d. Tap Save
If you already have a Related List Quick Component, Groopit Shared Data is automatically added. - Add an Insights tab after Activity and Chatter tabs in the Tab component.
If your configuration does not include an Activity or Chatter component, we recommend adding the tab wherever users will be working most often, so it’s visible and easily accessible. To add this component:
a. While in the page editor, find and select the tab component on the page.
b. In the right-hand, navigation tap Add Tab
c. Rename the tab by clicking the new tab that was created.
d. Choose custom from the top of the drop-down, enter “Insights” into the custom label and tap Done. It will be available for future use.
e. Tap the tab name and choose Insights from the drop-down list.
f. Tap Done
g. Add the Groopit related list component to the tab by clicking on the Insights tab on the page.
h. Drag and drop Related List – Single from the component list on the left-side to the Tab to the “Add component(s) Here” box.
i. Set Groopit Shared Data as the related list. From the left-hand navigation, tap the drop-down under “Related lists” and choose Groopit Shared Data (or if you created a unique name for the Groopit Shared Data during setup, choose that name).
j. Tap Save to save your changes. - Repeat the above steps to configure the Object page for any additional objects.
The Groopit Application for Salesforce should now be installed and ready for testing.
Test
Here is a list of items to review prior to deployment
Installation and Setup
- Verify that Groopit shows up as a related list on the desired objects
- Test users with different profiles/permissions to verify Groopit is visible to the right users
- Verify that users have Read and Edit access to all fields on the Groopit Shared Data object.
- Verify that the group you connected is available to select. If you added multiple groups, they should all be listed.
- Confirm that Sign-in is working properly.
- You should be prompted to sign in the first time. A popup window will open to complete sign in. It should close automatically after signing in and you shouldn’t be prompted to sign in again
Share Data
- Share data via Groopit App for Salesforce. Confirm data in Groopit Shared Data record is accurate.
- Verify that the lookup field gets populated with the correct object after creation. For example, if you are using “Account” as your Salesforce object, the correct account is set.
- Verify that the Groopit Shared Data shows up in the related list for the associated Salesforce object. For example, if you are using “Account” as your Salesforce object the Groopit Shared Data appears in the account correctly.
- Go to Groopit website https://app.groopit.co and make sure you see the related object in Groopit
- Edit the report in Groopit and return to Salesforce and make sure it was modified in Salesforce. To edit a report:
- Find the report you want to edit
- Click on the three dots in the upper right-hand corner of the report by the user name
- Choose Edit from the drop-down
- Make any changes
- Click Save