How to set-up the Groopit App for Slack
Integration Requirements
- You must be an existing Groopit customer to use the Groopit App for Slack. (Request a demo to learn more.)
- You must be the administrator of the Groopit you want to integrate.
- Your Groopit email must match your Slack user email. If yours does not match, email help@groopit.co.
Complete Groopit Set-Up
In order to set-up Groopit for Slack, you must first complete the set-up of Groopit and be administrator of an active subscription. Please complete the following steps or verify that each step of Groopit set-up has already been completed.
- Sign up for Groopit using the same email address you use in Slack.
- Choose “Start a new group” and follow the instructions. Or, if you are already a Groopit Organizer, select from the list of existing groups you organize.
- Choose “People” to verify that you are listed as an Organizer.
- Choose “Share” and +Create a new Data Model to set-up at least one Data Model.
Once your Groopit has been set-up, it’s time to set-up the Groopit App for Slack.
Connect Groopit to Slack
Once Groopit has been set-up, it’s time to connect it to Slack. You will add the Groopit App for Slack from inside Groopit.
- From your Groopit, tap Share in the main navigation
- Tap + Add to Slack above the list of Data Models

- Review the instructions and tap Add to Slack

- Review the requested permissions, then click Allow
During the installation process, you may be prompted to “request approval for app installation” from the Slack workspace administrator. Follow the Slack prompts to do so. Once you have received a Slack message approving your request, return to Groopit and repeat the steps above.
Once installed, connect Groopit to Slack channels.
- Log into Groopit with administrative privileges, if you arent already logged in.
- Click “About” in the left-side navigation menu
- Tap “Settings” in the upper right corner
- Scroll down to the “Set up Groopit App for Slack”
- Find “Grant permissions so Slack users can share data from any channel”, and tap the gray “Grant Permissions” button.

This will bring up the Data Sharing page - Tap +Connect new Slack channel

- Select the correct Slack Workspace from the drop-down
- Select the Slack Channel to connect from the drop-down
- Tap “Add”
- Repeat steps 6-9 for additional channels
Share Data from Slack
Type /groopit and start sharing data right from Slack.
If you need additional assistance, email help@groopit.co or visit https://groopit.co/help-center/
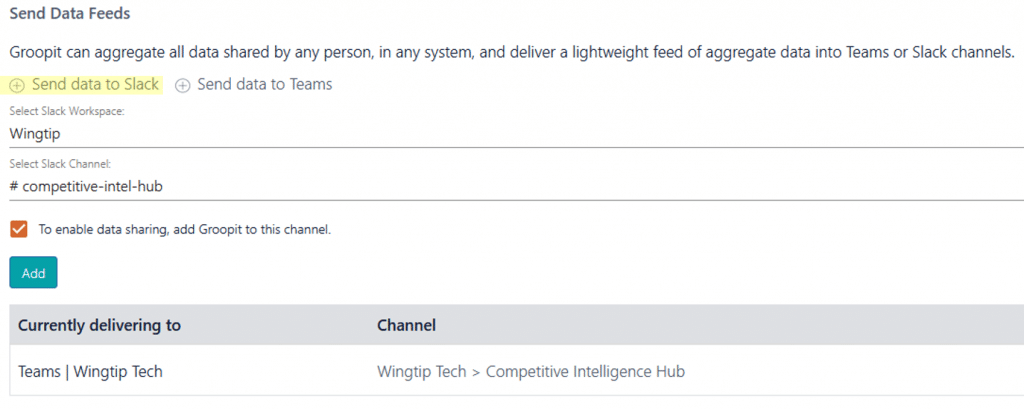
Deliver aggregate data feed to channels in Slack
Users can share data from any Groopit client (web, mobile, Teams, Slack and Salesforce) and the aggregate feed of the shared data can be delivered automatically and in real-time to a Slack channel. Here’s how:
- Log into Groopit with administrative permissions
- Go to Share in the navigation menu
- Find the Data Model that has the shared data you want to deliver to a Slack channel and tap the three dots in the lower right-hand corner
- Select Send Data Feeds
- Tap Send data to Slack

- Below your Slack Workspace, tap Select Slack Channel
- Pick the applicable Slack channel from the list
- If this is your first time setting up the channel, check the box “to enable data sharing, add Groopit to this channel.”
- Tap Add
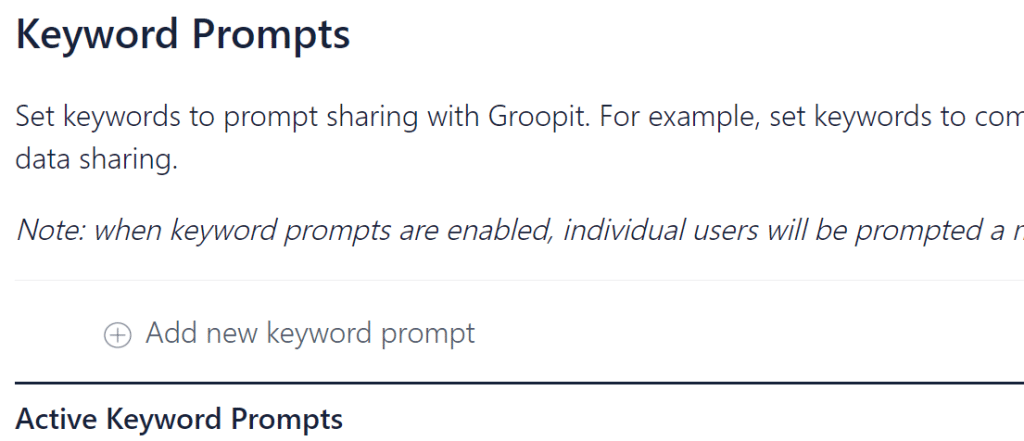
Add Keyword prompts to Slack
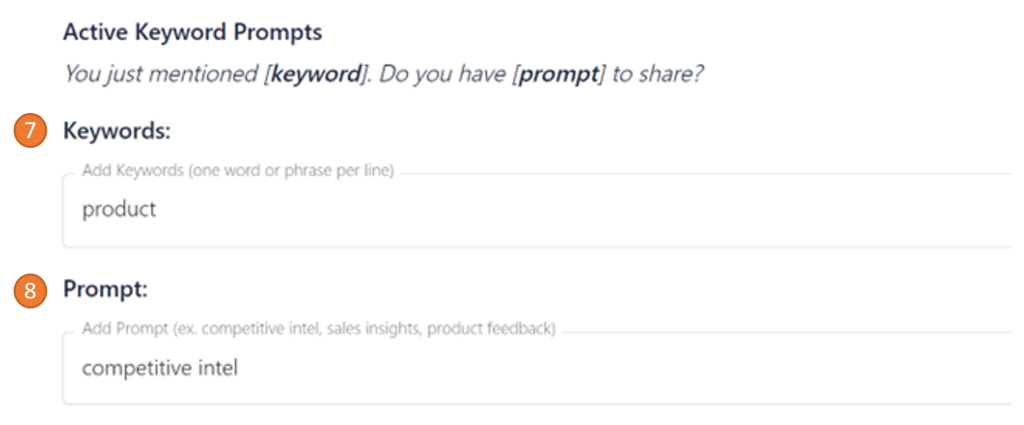
With keyword prompts you are creating a message that will prompt the user to share data via Groopit whenever a keyword is used. The message in the channel reads: You just mentioned [keyword]. Do you have [prompt] to share? Type ’/groopit’
Here’s how to setup keyword prompts:
- Tap “About” in the left-hand navigation menu
- Tap “Settings” in the upper right corner
- Scroll down to the “Set up Groopit App for Slack”
- Find the Set keywords item on the list

- Tap “Set Keyword(s)” to be taken to the Keyword prompts
- Tap +Add new keyword prompt

- Under Active Keyword Prompts, in the box below Keywords, enter the keyword. You can have multiple keywords or phrases. Add them each on their own line. Groopit will search whether a message contains the word or phrase.
- In the gray box under Prompt, add the prompt. For example, competitive intel

- Tap “Save” on the right side
Test out the prompt by commenting to the channel with the keyword.


